
Art Help for Creating Your Own Book Cover
PAGE BOOKMARKS: Tools and resources you need | How to design a book cover
OTHER INFORMATION: How to Make Your Own Template | Book Cover Templates | Author Help
Tools and resources you need to create your own book cover.
Book covers are large graphic files. To create them requires a considerable amount of computer resources and skill. Unless you use an online tool like Canva (read the fine print), Amazon's Cover Creator (free), or similar tools, to accomplish the job, you'll need access to a relatively powerful personal computer — desktop or laptop — preferably one with a good amount of RAM that is connected to a large monitor or screen. You may also want to use a graphics tablet and stylus, especially if you like to draw by hand. ADVICE: Beware of online apps and tools. A lot of them have use limitations. CAREFULLY READ THE TERMS OF SERVICE/USE/LIMITATIONS.... (Yes, all that fine print.)
REMEMBER: YOU OWN COPYRIGHT ON ANYTHING YOU CREATE THAT IS ORIGINAL, so, in the long run, it's wise to create everything from scratch and/or, if incorporating images captured or created by another, to only use public domain or CC0 (Creative Commons Zero — no copyright reserved) images.
If you are going to do it yourself on a computer, you'll need access to at least one, probably several, image creation and manipulation applications that can do the job required. (WARNING: Most of these programs have a relatively steep learning curve for beginners.) Here are a few well-known ones:
- Adobe applications (InDesign, Photoshop, Illustrater, etc.),
- GIMP (free alternative to Adobe Photoshop),
- Inkscape (free alternative to Adobe Illustrator, vector graphics),
- Scribus (free alternative to Adobe InDesign),
- Dogwaffle (raster imaging, effects, animations, and 3D),
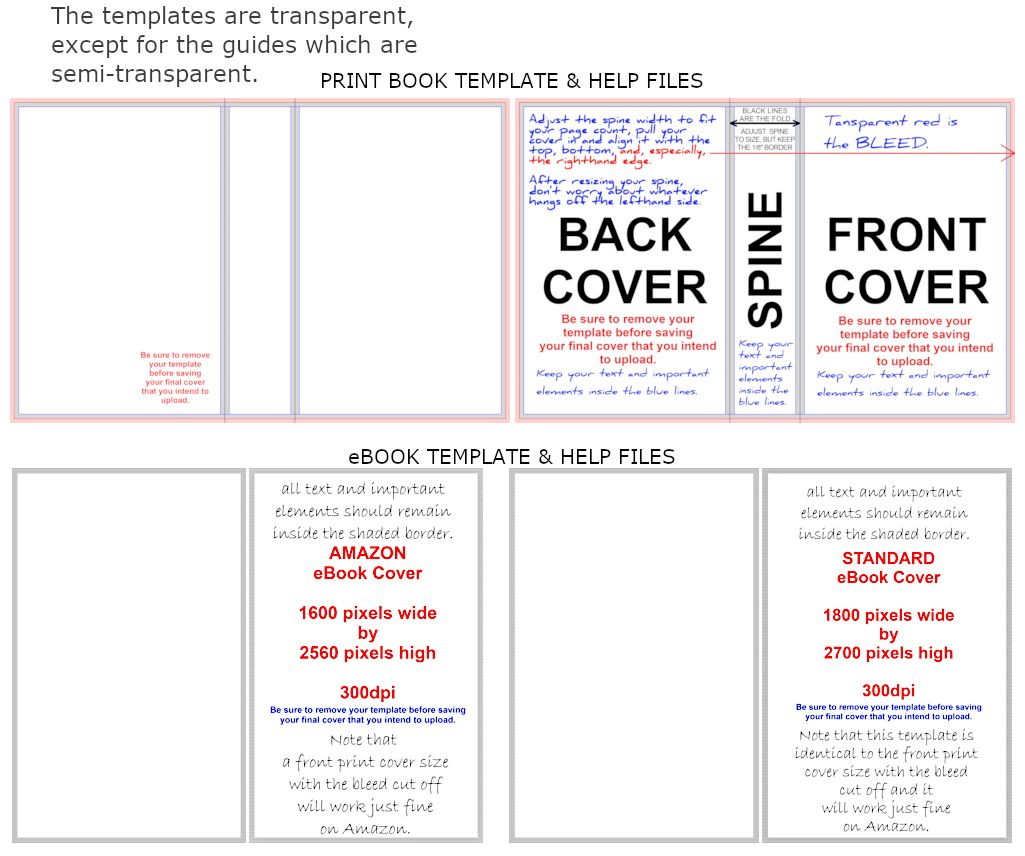
Templates
You'll also need to build or use a template, so you maintain the proper ratios, margins, and don't neglect the bleed. Here are instructions on how to build your own template. Alternately, I offer a variety of templates for Do-It-Yourself book cover projects. These templates come in the most popular trim sizes and include eBook templates and help files, too:
- 5" x 8",
- 5.25" x 8",
- 5.5" x 8.5",
- 6" x 9",
- 8.5" x 11".
Creating Elements of Your Cover
If you are seeking to include one or more humans, animals, monsters, mythic entities, or alien life forms on your cover, you'll need access to, either or both, a stock image source, of which there are many, (Again, BEWARE the usage limitations. Check the fine print.) and/or a program where you can “design your own [human/animal/monster...]” which would be MakeHuman, DAZ 3D, Poser, Blender, or similar rendering programs.
If you are trying to create your own landscape, I advise the Dogwaffle Project or Bryce Pro which, if you dig a little, you can find at DAZ 3D. There are others. Search for CG landscape creation software on your favorite search engine.
If you are trying to build your own castle, building, residence, town, city, or... try Blender. There are python scripting resources you can add in to do it.
If the learning curve is too steep for you, hire an artist who does the kind of work you need. (BE AWARE: Working with a graphic artist and designer can cost tens to hundreds to thousands of dollars. Pencil out the advantages and disadvantages with respect to your budget. [See my Author Help page.])
Design and Finishing
In the design process, make sure you start with a big enough image. I offer templates, but you can also make your own. Remember margins and bleed. Remember that most of you will want to create a paperback version as well as an eBook version, even though you might not think you need to. So start with the paperback design, because the eBook cover is, basically, the cover of the paperback front cover.
Once you have your cover designed to your satisfation, you'll need to format your manuscript for print, including appropriate font(s), line spacing(s), any text embellishments, and recto/versa (right/left) page considerations. (I suggest using Ray Hoy, because he's very good and his prices are very reasonable. Ray Hoy's book formatting service is located here: https://www.mistymountainproductions.com/home.) If you prefer to save money and do it yourself, you can, but, again, the learning curve could be difficult for those unfamiliar with using the programs necessary for success, including but not limited to Microsoft Word, Open Office (free), Libre Office (free), Calibri (free), Vellum.... Once you've got your print book version formatted, including all end matter and forematter in your page count and any blank pages you have to insert with respect to proper format of recto and versa pagination, you should be able to calculate your final page count, which you need in order to download the proper template for these considerations and choices:
- the type of paper (there are from several to multitudes, depending on your printer/POD) you plan to have your book printed on,
- whether it's a black and white interior or color interior,
- the type of interior content bleed (full bleed or not),
- and trim size, of which there are many.
Once you know that, if you are using Amazon, you can secure a cover template here once your book is formatted: https://kdp.amazon.com/en_US/cover-templates. Other PODs and printers offer their own. Check their websites for instructions on how to secure their templates. Be aware that some PODs and printers do charge a fee everytime you need to make changes to your manuscript and/or cover (Ingram/Lightning Source, for example).
How to design a book cover from scratch.
- Build or open a template file sized to the potential largest sized image you will need for your book cover. (Note that, if you create your images utilizing a vector graphics program instead of a raster image program, you can ignore size [but not ratio], because vector images can be enlarged or reduced at will with no degradation of the image. But. Bigger is always better and vector graphics have some inherent limitations.) Your print book template should reflect the trim size you are choosing (remember there is a spine and a back cover), plus the bleed pixels on all sides, the image set at 300 ppi (dpi) and sRGB or RGB color. (PPI means 'pixels per inch' and DPI means 'dots per inch', so a 5" x 8" (width by height) trim size with a spine of 1.25" in width including bleed would yield an image that is 3450 pixels wide and 2475 pixels high.) Height should be no less than 2475 pixels with width ranging upward from a minimum of 3095 pixels. I'd advise using a height of no less than 2775 pixels, the necessary width relative to that. You can always downsize an image, but enlarging one is problematic.
- If using a template, open the template, then rename the file to something unique. I use Title_Author_Version_Date.tag (IntoTheStorm_JaneDoe_3B_7-8-2020.psd).
- Extend your background over the whole image, which should include back cover, front cover, an over-width spine area, plus the bleed. Remember, too big and too much is never a problem. Too small or not enough is.
- After ensuring your background 'wraps' across the whole image span, you can ignore the back cover and spine areas until you've finalized your front cover design.
- I strongly advise you to work with your title and byline first. Try several variations and placements. Then work your imagery with respect to them. If you do start with the imagery, be sure to keep title and byline placement in mind as you work.
- If you are adding a brand mark, an editorial remark, and/or a slug or tag line, place it/them now.
- Once you have your front cover completed to your satisfaction, duplicate your title and byline for the spine, adjusting as necessary. Half the time, duplicating them, even with adjustments, won't work, so you'll have to re-create them, mimicking the treatment and feel of the front cover work, but adjusting the letters to accommodate the space limitations of the spine. (Note that spine lettering is usually set with either a 90° clockwise rotation or, less usually, as vertical text.)
- It is sometimes nice to include some branding mark, symbol, or design element on the spine, either at the top, in the middle between the title and byline, or at the bottom. It adds a nice touch.
- On to the working on the back cover, now.
- Make very sure you leave space for the bar code. It will be marked on the template you receive from your printer or POD. The background there is usually white.
- Add whatever you've decided to include on your print book back cover. These could include a book blurb/description, an editorial review (or piece of one) along with credit and maybe a URL of the reviewer, a picture of the author, a short author bio, the author's website URL, and/or maybe yet again a branding mark, symbol, or design element repeated from the front.
- After saving your file in layers, save it as a different file name (add flat to the end, or something), flatten it, then export to .jpg, .png, and/or any other format you want as well as your printer's favored format, usually .pdf for print covers. Once your print cover is saved, open the .jpg, crop the canvas to remove the bleed, spine, and back cover, then save as a different version of your file name as your eBook cover. Standard eBook covers are 1800 x 2700 pixels and Amazon preferred specs are 1600 x 2560 pixels (That's width x height, by the way.) I tend to ignore Amazon specs and use the 1800 x 2700 pixels size for book that are 5" x 8" on up to 6" x 9", but some prefer the 1600 x 2560 pixels size. For 8.5" x 11" books, I keep the ratio of the print book cover, so the pixel size is: 2550 x 3300 pixels